bluename
 How to Pot Sundew in the Correct Container: A Step-by-Step Guide from a Fellow Plant Lover
I’ve killed my fair share of sundews. There, I said it. It’s a painful admission for any carnivorous plant enthusiast. The heartbreak isn’t just about losing a plant; it’s the frustration of knowing you followed the “basic” care instructions—distilled water, plenty of light—yet your Drosera still withered away. More often than not, I discovered the silent killer wasn’t the water or the light, but the very foundation of its home: the container. Choosing and preparing the correct pot for a sundew is arguably the most critical, yet most overlooked, step for long-term health. After years of trial and error, and a particularly enlightening two-week experiment, I’ve perfected a method that works. This guide is my firsthand account of how to pot sundew plants successfully, ensuring they not only survive but thrive.
Why Your Sundew’s Pot is a Matter of Life and Death
Sundews aren’t your average houseplants. Hailing from nutrient-poor bogs, their roots are exquisitely sensitive to minerals, salts, and soil chemistry. A standard terra cotta pot, for instance, can leach harmful minerals into the soil. A container without drainage becomes a toxic, anaerobic swamp. The wrong size pot can either drown the delicate roots or dry them out too quickly. Getting the container right is the first and most concrete act of replicating their natural, soggy, acidic habitat. As the experts at the International Carnivorous Plant Society (ICPS) consistently emphasize, cultivation success starts with the growing medium and its environment—the pot being a fundamental part of that system.
My Two-Week Potting Experiment: Observation and Revelation
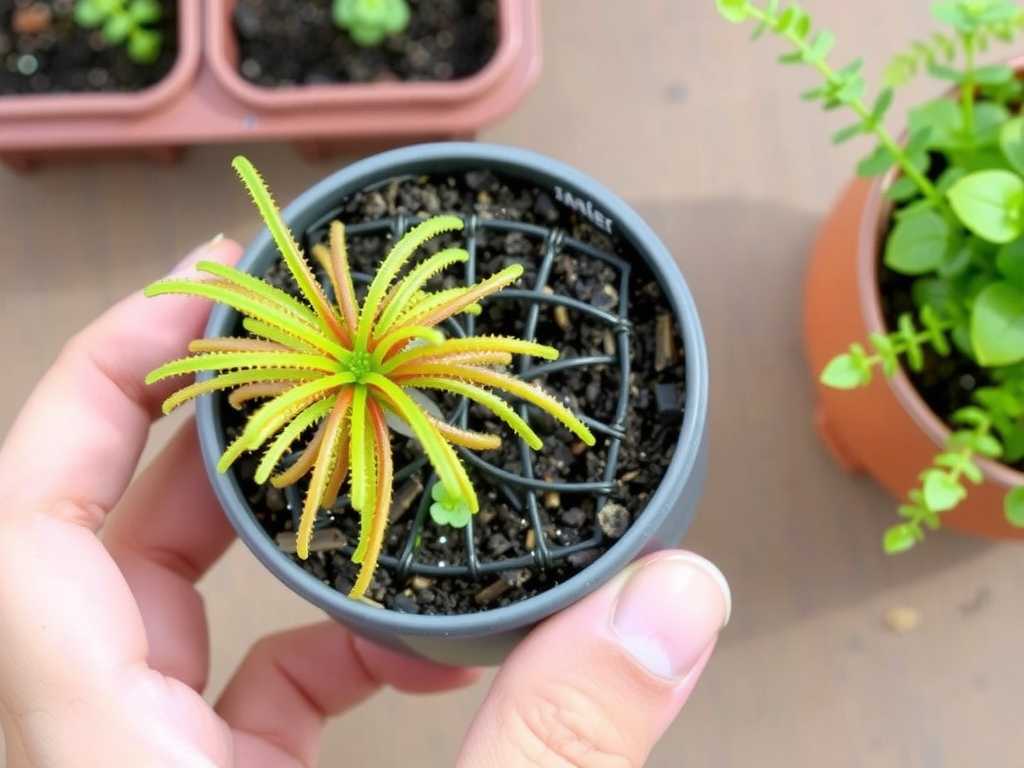
To demonstrate the stark difference the correct container makes, I conducted a simple side-by-side test. I took two divisions of the same Drosera capensis ‘Alba’ plant. For one, I used my new, optimized potting method. For the other, I used a common but flawed setup: a glazed ceramic pot with a single small drainage hole, filled with a slightly denser peat mix. I placed them side-by-side on the same windowsill, watered them identically with distilled water, and observed them daily for two weeks.
The results were dramatic and solidified my convictions. By day four, the plant in the flawed pot showed slowed dew production. By day ten, the older leaves began to blacken at the tips—a classic sign of stress often related to poor root oxygenation or salt buildup. Meanwhile, the sundew in the correct container showed vigorous new growth, with tiny, sticky leaves unfurling from the center and glistening with abundant dew every morning. This visual proof was all I needed to standardize my approach.
Step 1: Selecting the Perfect Sundew Container
This is where most beginners, including my past self, go wrong. We reach for what’s pretty or convenient. Here’s what to look for, based on hard-earned experience.
Material is Paramount: Plastic is Your Friend Avoid clay, ceramic, or terracotta at all costs. Why? They are porous and will accumulate mineral salts from water and fertilizer (even if you aren’t intentionally fertilizing, tap water residues will do it). These salts will eventually poison your sundew. I learned this the hard way with a beautiful glazed pot that still had an unglazed drainage hole—salts built up as a white crust around the base, and my plant suffered. Food-grade plastic pots are inert, lightweight, and won’t interfere with the soil chemistry. They are the unanimous recommendation from seasoned growers in forums and societies like the ICPS.
Drainage Holes: Non-Negotiable and Numerous One small hole is not enough. Your goal is to allow free water flow through the soil, flushing out any potential toxins and pulling fresh air into the root zone. I now use pots with multiple large holes in the bottom. Some growers even use net pots or orchid pots for maximum aeration. The key is that water must be able to exit as freely as it enters.
Size Matters: Small, Shallow, and Snug Sundews have surprisingly shallow root systems. A deep pot holds too much wet soil below the roots, which stays cold and soggy, promoting rot. A pot that is too large dries out unevenly. Choose a pot that is just 1-2 inches wider than the plant’s current root ball. A 3-4 inch pot is ideal for most common sundew species for their first few years. This promotes a healthy, dense root structure and makes moisture management easier.
Step 2: Preparing the Ideal Soil Mix
The container holds the medium, and both must work in harmony. Never, ever use potting soil, compost, or fertilizer. It will be fatal.
The Classic Mix: Sphagnum Peat Moss and Perlite My go-to, and the industry standard, is a 50:50 mix of unfertilized sphagnum peat moss and horticultural perlite. The peat provides acidity and moisture retention, while the perlite ensures aeration and prevents compaction. I source my peat from a reputable brand that guarantees no added fertilizers or wetting agents.
A Living Alternative: Long-Fibered Sphagnum Moss For smaller or more delicate sundews, I often use pure, live or dried long-fibered sphagnum moss. It’s fantastic for moisture and air, and its natural acidity is perfect. It’s easier to pack around small roots without damaging them. Rinse both peat and perlite or moss thoroughly with distilled water before use to remove any dust.
Step 3: The Potting Process – A Gentle Hands-On Guide
Now, let’s put it all together. Here is my meticulous, step-by-step process for potting a sundew plant.
- Soak Your Medium: Place your prepared peat/perlite mix or sphagnum moss in a bowl and soak it thoroughly with distilled water. Let it sit for an hour to fully hydrate. Dry peat will repel water and create dry pockets.
- Prepare the Pot: Cover the drainage holes with a small piece of plastic mesh or a few strands of sphagnum moss to prevent the medium from washing out. Do not use rocks or gravel—this creates a perched water table and reduces effective pot depth.
- Fill and Form: Fill the pot about halfway with the moist medium. Gently press it down to eliminate large air pockets, but don’t compact it into a brick.
- Handle the Roots with Care: Remove your sundew from its old pot. Gently rinse the old medium from the roots using distilled water. This is crucial to inspect the roots (white and firm is good; black and mushy needs trimming) and start fresh. Be incredibly gentle; sundew roots are fragile.
- Position the Plant: Create a small hole in the center of your new medium. Place the sundew’s roots into the hole and gently spread them. The crown of the plant (where the leaves emerge) should sit right at the surface, never buried.
- Fill and Settle: Carefully add more moist medium around the roots, supporting the plant upright. Tap the pot lightly on the table to help the medium settle. Do not pack it down tightly.
- The First Watering – The Tray Method: This is the golden rule for sundew watering. Place your newly potted sundew into a shallow tray or saucer. Pour distilled water into the tray, filling it to about 0.5 to 1 inch deep. The water will wick up into the pot from the bottom, perfectly moistening the soil without disturbing the surface or the plant. Always maintain water in this tray. This mimics the constant dampness of their bog habitat.
The Pitfalls I’ve Encountered (And How to Fix Them)
- The Fungus Gnat Invasion: Using peat in a constantly wet environment can attract fungus gnats. I fought this for weeks! My solution was to top-dress the soil with a 0.5-inch layer of horticultural sand or milled sphagnum moss. This creates a dry, barrier layer that deters gnats from laying eggs.
- The Algae Bloom: On the soil surface, green algae can appear, especially in bright light. While mostly harmless, it’s unsightly and can indicate staying too wet on top. Improving air circulation, using the bottom-watering tray method exclusively, and that sand top-dressing solved this issue.
- The “Soggy Center” Syndrome: In my early days, I’d press the soil too firmly, creating a dense, soggy core that rotted the crown. The fix is the gentle handling and the fluffy, aerated mix described above. If the crown ever looks mushy, unpot immediately, trim any rot, and repot in fresh, airy medium.
Post-Potting Care and Ongoing Observation
Your job isn’t over after potting. For the first week, keep the plant in bright, indirect light to reduce transplant stress before moving it to its permanent, sunny spot (4-6 hours of direct sun or equivalent grow light). Continue using the tray method with distilled or rainwater exclusively. Observe your plant daily. New dew production is the ultimate sign of success. Within that critical two-week window, you should see signs of active growth if everything is correct.
FAQ
Can I use a self-watering pot for my sundew? I do not recommend standard self-watering pots, as they often keep the soil too uniformly saturated and can make it difficult to flush the soil. The simple tray method is far superior and gives you more control.
How often should I repot my sundew? Most sundews are happy in the same pot for 1-2 years. Repot when the medium looks broken down and compacted, or when the plant has completely outgrown its container. The best time is in early spring as they enter a major growth phase.
My pot seems fine, but my sundew is dying. What else could it be? Always double-check your water source. Tap water, even filtered, usually contains dissolved minerals that will slowly kill carnivorous plants. Switch to distilled, reverse osmosis, or rainwater immediately. Also, ensure it’s getting enough light—these are sun-loving plants.
Choosing and using the correct container for your sundew isn’t just a detail; it’s the cornerstone of its survival. By selecting an inert plastic pot with superb drainage, filling it with an airy, nutrient-free medium, and employing the consistent tray watering method, you create a stable, hospitable micro-habitat. My two-week experiment clearly showed that a plant in the right pot recovers faster, grows vigorously, and produces the spectacular, dewy traps we all cherish. By avoiding the common pitfalls and following these hands-on steps, you’re not just potting a plant—you’re engineering a tiny, thriving bog ecosystem on your windowsill.