How to Fix Sundew Soil Being Too Dry: A Complete Rescue and Prevention Guide
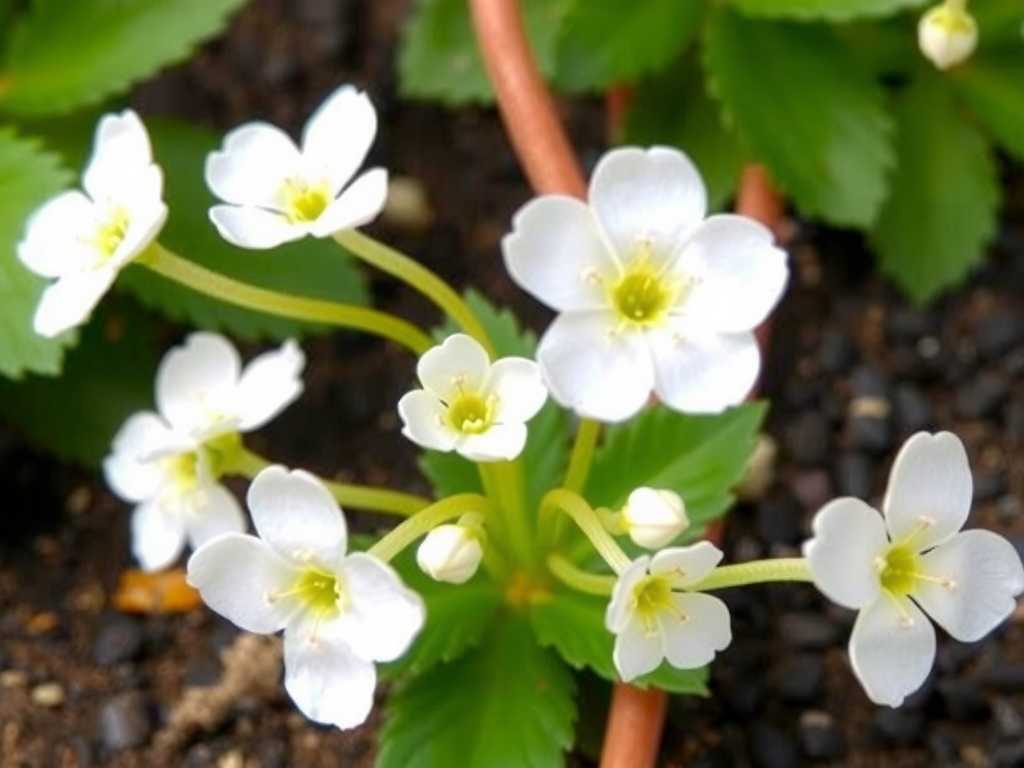
You've noticed the telltale signs. The once-glistening, sticky droplets on your sundew's tentacles have vanished, leaving behind a dull, dry-looking plant. The soil in the pot feels like dust, pulling away from the edges. Your sundew, a captivating carnivore that thrives in boggy conditions, is sending a clear distress signal: its soil is critically too dry. This is one of the most common and urgent issues for sundew growers, but don't panic. A dehydrated sundew is often remarkably resilient. This guide will walk you through exactly how to diagnose, immediately fix, and permanently prevent dry soil to ensure your sticky-leaved friend not only survives but flourishes.
Understanding Why Moisture is Non-Negotiable for Sundews

Sundews (Drosera) are not your average houseplants. In the wild, they predominantly inhabit wetlands, seepage areas, and bogs where their roots are constantly in contact with moist, mineral-poor, and acidic soil. Their evolution in these environments means they lack the adaptations that allow other plants to tolerate drought. Their delicate, fibrous roots are designed for constant, gentle moisture, not for seeking out water in dry substrate. When the soil dries out, the roots quickly desiccate and die, cutting off the plant's water supply. This leads to halted growth, loss of dew production (which is essential for catching prey and obtaining nutrients), and if uncorrected, the eventual death of the plant.
Immediate Action: Step-by-Step Rescue for Bone-Dry Sundew Soil
When you've confirmed the soil is completely dry, swift and correct action is crucial. Avoid the temptation to simply flood the pot; this can shock the remaining roots.
Step 1: The Bottom-Soaking Method This is the safest and most effective revival technique. Take the entire pot and place it in a shallow bowl, saucer, or tray. Fill the container with distilled water, reverse osmosis water, or rainwater until the water level reaches about one-third to one-half the height of the pot. Let the pot sit in this water bath. You will see air bubbles rising and the soil slowly darken as it wicks moisture upward from the bottom. This process can take 30 minutes to a few hours for a thoroughly dry pot. It ensures even, gentle rehydration without disturbing the soil structure or the plant's roots.
Step 2: Transition to the Tray Method Once the soil surface is visibly moist and the pot feels heavy, you can transition to the standard sundew watering technique: the tray method. Remove the pot from the deep soak and place it in a permanent watering tray. Keep about 0.5 to 1 inch (1-2 cm) of water in the tray at all times. The soil will continuously draw up the water it needs, mimicking its natural bog habitat. Check the tray daily and top it up as the water is absorbed or evaporates.
Step 3: Environmental Support While the soil rehydrates, boost the humidity around your sundew to reduce stress on its leaves. You can place a clear plastic bag loosely over the plant (like a mini-greenhouse) or use a humidity dome for a few days. Ensure it gets bright, indirect light during this recovery phase—direct hot sun on a stressed plant can worsen dehydration.
Diagnosing the Root Cause: Why Did Your Sundew Soil Dry Out?
Fixing the immediate crisis is only half the battle. To prevent recurrence, you must identify the underlying cause.
- Inadequate Watering Routine:Relying on top-watering alone is the most frequent mistake. Sundew soil needs constant capillary action from below. Top-watering often leads to uneven moisture, with the bottom remaining dry while the top appears wet.
- Incorrect Soil Mix and Pot Choice:Standard potting soil or mixes that contain fertilizers, compost, or heavy clay will compact, drain poorly, or become hydrophobic when dry. Similarly, terracotta pots are porous and wick moisture away from the soil. As noted by carnivorous plant expert Dr. Barry Rice in his bookGrowing Carnivorous Plants, "The medium must be able to stay uniformly damp without becoming waterlogged, and it must be low in nutrients."
- Environmental Factors:High temperatures, strong air circulation from fans or vents, and low ambient humidity will dramatically increase evaporation rates from both the soil and the tray.
- Pot-Bound Roots:A sundew that has outgrown its pot will have a dense root ball that consumes available water rapidly and leaves little room for moisture-retentive soil.
Long-Term Prevention: Creating the Perfect Moist Environment
Choosing and Maintaining the Right Soil MixThe ideal sundew soil is airy, moisture-retentive, and nutrient-free. A 50:50 mix of sphagnum peat moss and perlite is the gold standard. Peat moss holds significant water while remaining acidic, and perlite ensures aeration, preventing compaction. Long-fibered sphagnum moss is another excellent option, either alone or mixed with perlite. Before using, always moisten your peat moss thoroughly; dry peat is famously water-repellent.
Mastering the Tray Watering SystemAdopt the tray method as your permanent watering strategy. This simple system provides a consistent water reservoir. The key is consistency—never let the tray go completely dry. During hot summer days, you may need to refill it twice; in cooler winter months, once every few days may suffice. Always use low-mineral water to prevent harmful salt buildup in the soil, which can also contribute to dryness and root burn.
Optimizing Pot Selection and PlacementUse plastic or glazed ceramic pots with drainage holes. Their non-porous nature prevents moisture loss. Ensure the pot is an appropriate size; a pot slightly larger than the root system is ideal. Place your sundew away from direct heat sources, air conditioners, or drafty windows. While they need bright light, managing the accompanying heat is part of moisture management.
")
Recognizing Early Warning SignsDon't wait for the soil to turn to dust. Watch for these early indicators: a loss of dew on the newest leaves, the soil surface turning a lighter color, or the water in the tray needing refilling more frequently than usual. Catching the problem early makes correction instantaneous.
Frequently Asked Questions
My sundew's soil is always wet on top but seems dry underneath. What's happening? This is a classic sign of a hydrophobic soil mix or severe compaction, often caused by using the wrong medium or top-watering exclusively. The peat moss may have dried out completely once, losing its ability to absorb water. The solution is to repot into a fresh, pre-moistened carnivorous plant soil mix and immediately employ the bottom-soaking and tray method to ensure even moisture throughout.
Can I use tap water for my sundew if I'm in a pinch? It is strongly discouraged. Tap water contains dissolved minerals (like calcium and magnesium) that accumulate in the soil over time. This buildup can "lock up" the soil, making it harder for the plant to absorb water (a physiological drought) and eventually poisoning the roots. For the long-term health of your sundew, distilled, reverse osmosis, or rainwater are the only reliable choices.
After fixing the dry soil, how long until my sundew produces dew again? Recovery time depends on the severity of the dehydration. If caught early, you may see new leaves with dew within a week. For a severely dehydrated plant that has lost many leaves, focus on root recovery first. New growth from the center, which may take several weeks, is your sign of success. Ensure it receives plenty of light, as dew production is directly energy-dependent.
A thriving sundew is a testament to providing the consistent moisture its unique nature demands. By moving from crisis management to understanding the principles of their boggy origins—embracing the tray method, selecting the correct soil and pot, and vigilantly monitoring their environment—you transform from a rescuer to a skilled cultivator. The reward is a dazzling display of glistening, dewy leaves, actively catching prey and growing with vigor, a clear indicator that you've mastered the essential art of keeping sundew soil perfectly, and reliably, moist.
发表评论