How to Care for Your Sundew After Propagation: A Grower’s 2-Week Survival Guide
You’ve done it. You’ve successfully propagated your sundew, watching tiny plantlets emerge from leaf cuttings or seeds. The excitement is real! But now, a wave of anxiety hits. These fragile new lives seem so different from their robust parent plant. How do you keep them alive? What’s the next step? I’ve been there, staring at a tray of microscopic Drosera, terrified that one wrong move would undo all my hard work. The post-propagation phase is where most failures happen, but it doesn’t have to be yours.
In this guide, I’ll walk you through exactly how to care for sundew after propagation, sharing the precise steps I follow, the critical mistakes I made, and the solutions that saved my plants. This isn’t just theory; it’s a documented journey from delicate propagule to established youngster, based on my hands-on experience over a crucial two-week observation period.

The Critical First 48 Hours: Setting the Stage for Success
The initial two days after you see growth are the most pivotal. Your propagules (whether plantlets or seedlings) are transitioning and are incredibly vulnerable.
My Setup for Newborn Sundews
I immediately ensure three non-negotiable factors: light, humidity, and water. For light, I place them under a strong LED grow light, about 12-15 inches away, for 14-16 hours daily. Direct, gentle sun through a window can work, but artificial light offers consistent intensity, which I’ve found prevents leggy, weak growth.
Humidity is paramount. I keep my propagation tray inside a clear plastic dome or a loosely sealed plastic bag. This creates a mini-terrarium, reducing stress as the baby plants develop their root systems. However, here’s the firstmajor pitfall I encountered: stagnant, super-saturated air leading to mold. My solution? I ventilate the dome daily for 15-20 minutes. This simple act of removing condensation from the walls prevents fungal outbreaks without crashing the humidity.
Watering must be perfect. I use only distilled, reverse osmosis, or rainwater. I maintain the “tray method,” keeping about 1/4 to 1/2 inch of water in the bottom tray at all times for the first two weeks. The soil surface should feel moist but not waterlogged. According to the Carnivorous Plant Society, maintaining pure water is the single most critical factor in preventing mineral burn, which young sundews cannot recover from.
Week 1: Observation, Adjustment, and the First Challenges
During the first week, your role shifts from active setup to diligent observer. Growth is often slow, and patience is key.
Monitoring Growth and Early Dew Production
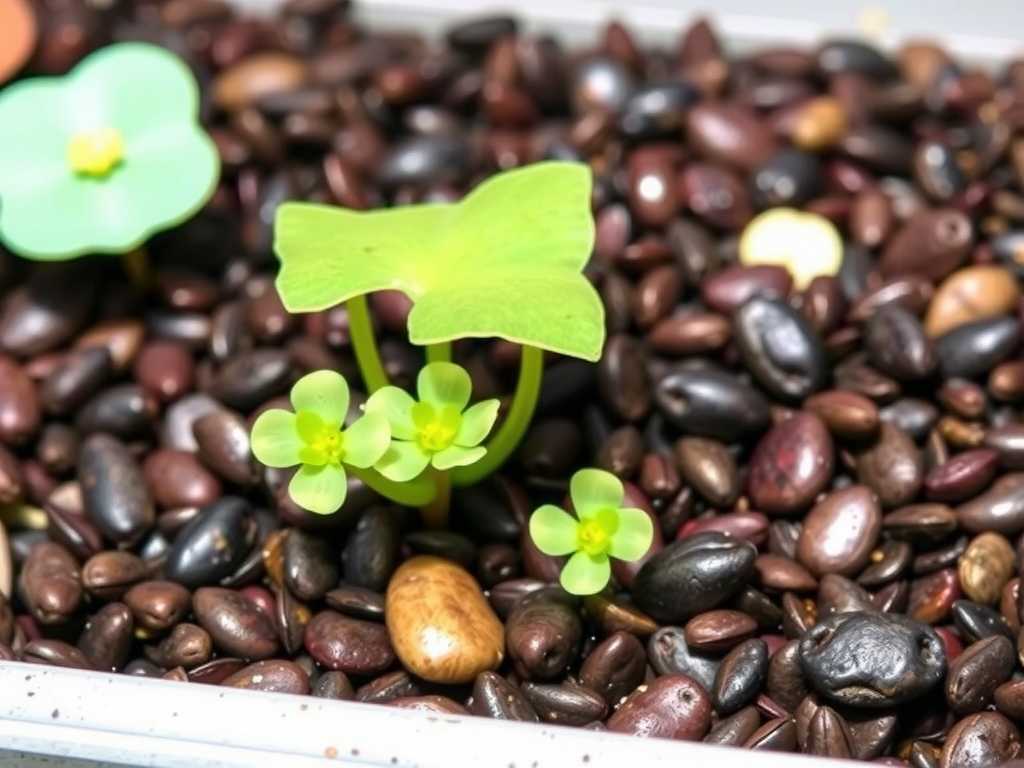
I check my propagules every morning. The goal is to see the first true leaves (not just the initial sprout) and, thrillingly, the emergence of tiny, sticky dewdrops. This is a sign of health. If dew is absent after 5-7 days, I reassess the light. Increasing intensity slightly usually triggers dew formation. In one batch, myDrosera capensisseedlings remained dew-less. I moved them 3 inches closer to the light, and within 48 hours, they were glistening.
The “Damping Off” Disaster and Recovery
Halfway through week one, I faced a classic horror: damping off. A couple ofDrosera spatulataplantlets suddenly wilted and turned to mush at the base. This soil-borne fungus thrives in overly wet, poorly ventilated conditions. I had been too cautious with ventilation. My immediate action was threefold:
- I carefully removed the affected plantlets with sterilized tweezers.
- I increased ventilation to two 30-minute sessions per day.
- As a gentle fungicide, I sprayed the soil surface and remaining plants lightly with a sulfur-based powder, a method supported by the International Carnivorous Plant Society for controlling fungal issues in seedlings.
This saved the rest of the tray. The lesson was clear: balance is everything. High humidity doesn’t mean zero air flow.
Week 2: Strengthening and Preparing for Independence
By the second week, successful propagules will show noticeable growth. They start to look like miniature versions of the parent plant.
Feeding for Accelerated Growth
This is a controversial but, in my practice, highly effective step: feeding. A sundew’s dew is meant to catch prey for nutrients. In a sterile propagation environment, they get none. Once I see consistent dew on leaves the size of a pinhead, I begin micro-feeding. Using a toothpick, I place anexceedinglysmall amount of crushed fish food or freeze-dried bloodworms (smaller than a grain of sand) on a few tentacles every 5-7 days. The response is dramatic—leaves enlarge and color deepens.A crucial warning: Overfeeding will rot the leaf. I learned this the hard way by using a piece too large. If a leaf blackens, snip it off to prevent mold spread.
Acclimating to Ambient Humidity
If your plants have been under a dome, week two is time to start the hardening-off process. Their survival depends on it. I begin by propping the dome lid open slightly, increasing the gap each day. Over 5-7 days, I remove it entirely. This gradual exposure trains them to tolerate lower humidity. I watch closely for any wilting. If it occurs, I recover the dome for another day and slow the process down. Rushing this step was another of my early mistakes, resulting in a batch of shriveledDrosera binataplantlets that I almost lost.
")
Long-Term Establishment: Potting On and Ongoing Care
After surviving the critical two-week window, your sundews are ready for the next phase.
When and How to Transplant
I wait until the plantlet has at least 3-4 true leaves and a visible root system before considering transplanting. I gently tease them apart if they’re in a cluster, using a sterilized tool. I plant them in their permanent carnivorous plant soil mix (a 1:1 peat moss/perlite blend is my standard) and keep them extra humid for a few days post-move to reduce transplant shock.
Creating the Ideal Permanent Environment
Your care for propagated sundews now merges with standard sundew care, but with a gentle touch. They still prefer consistently moist soil and very bright light. I continue the tray watering method indefinitely. As expert and author Barry Rice notes in his seminal work,Growing Carnivorous Plants, the stability of conditions—light, water, humidity—is more important than achieving “perfect” levels, especially for young plants.
How often should I water my newly propagated sundew?Always use the tray method with pure water. For the first two weeks, keep 1/4-1/2 inch of water in the tray constantly. Once established, you can allow the tray to dry out for a day before refilling, but never let the soil itself become dry.
Why are the leaves of my new sundew plantlet turning brown or black?This is usually a sign of stress. Common causes are mineral burn from tap water, sunburn from too-intense light too quickly, or physical damage. If it’s one leaf, remove it. If it’s many, reassess your water source and light distance. Overfeeding can also cause individual leaves to die back.
When can I start feeding my baby sundew?Wait until it is actively producing sticky dew on multiple leaves. Start with microscopic amounts—think dust-sized—on one or two tentacles per plant, no more than once a week. Their digestive systems are tiny and can be overwhelmed easily.
Seeing your propagated sundews thrive is one of the most rewarding experiences in plant cultivation. It transforms you from a caretaker into a creator. The key is to mimic their natural, nutrient-poor, sunny, and humid bog environment while vigilantly guarding against the hidden threats of mold and over-enthusiasm. By focusing on pure water, strong light, balanced humidity, and patient observation, you’ll guide these fascinating carnivores from fragile starts into the glistening, insect-catching wonders they are meant to be. Remember, every brown leaf is a lesson, and every new dewdrop is a triumph.

发表评论